SPA Image Alignment Modes
Reference Charts
Player Modes
| Mode | Face Detection | Top Alignment | Bottom Alignment | Horizontal Alignment | Scaling Basis | Notes |
|---|---|---|---|---|---|---|
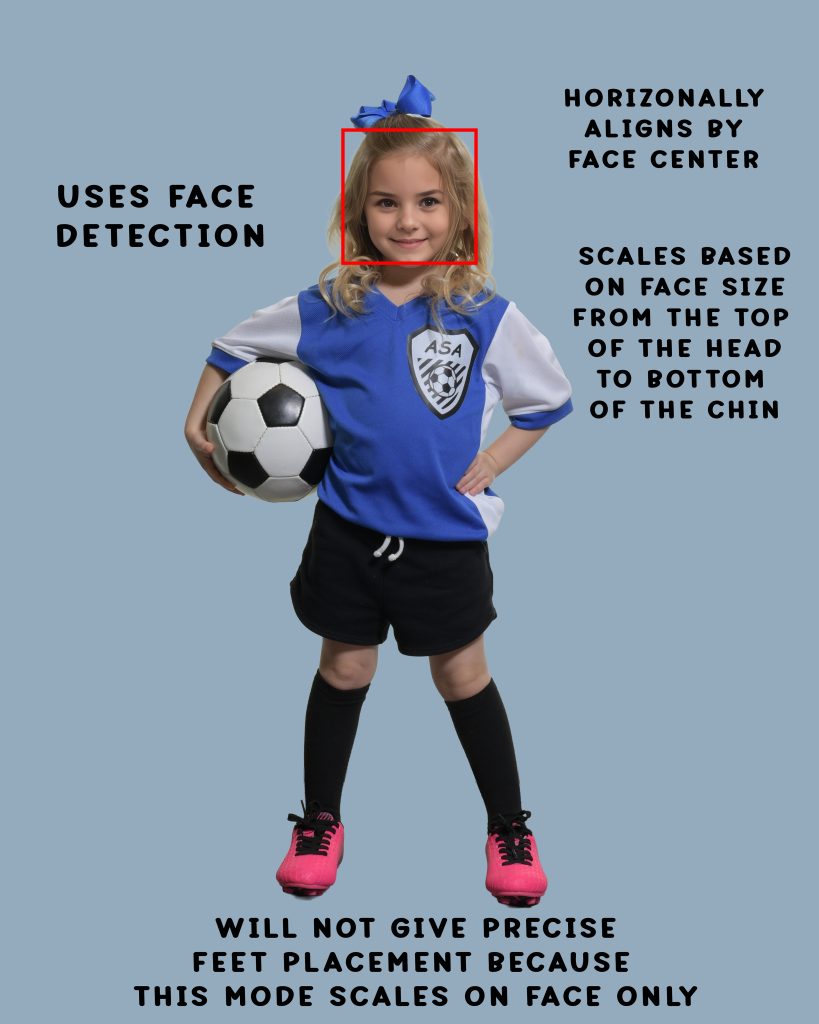
| 1 | Yes | No | No | Face Center | Face Size: Top of Head to Chin | Aligns face within red box; does not align feet. |
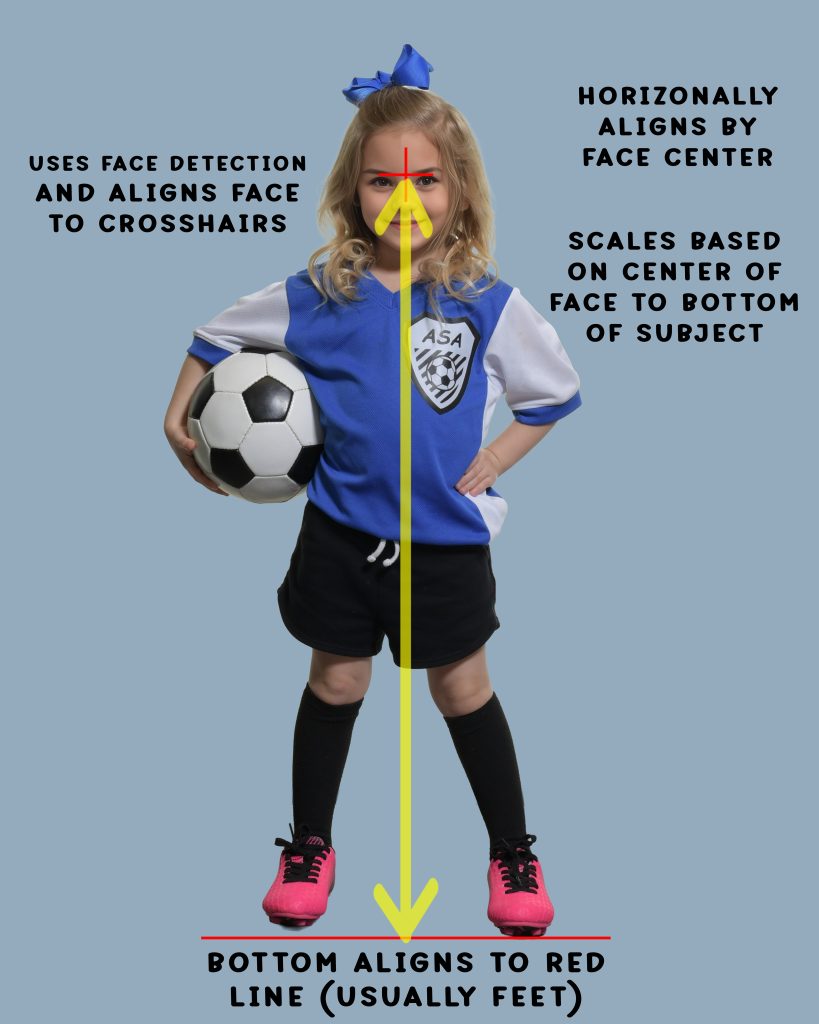
| 2 | Yes | No | Yes | Face Center | *Center of Face to Bottom of Subject | Aligns face to crosshairs; bottom aligns to red line (usually feet). |
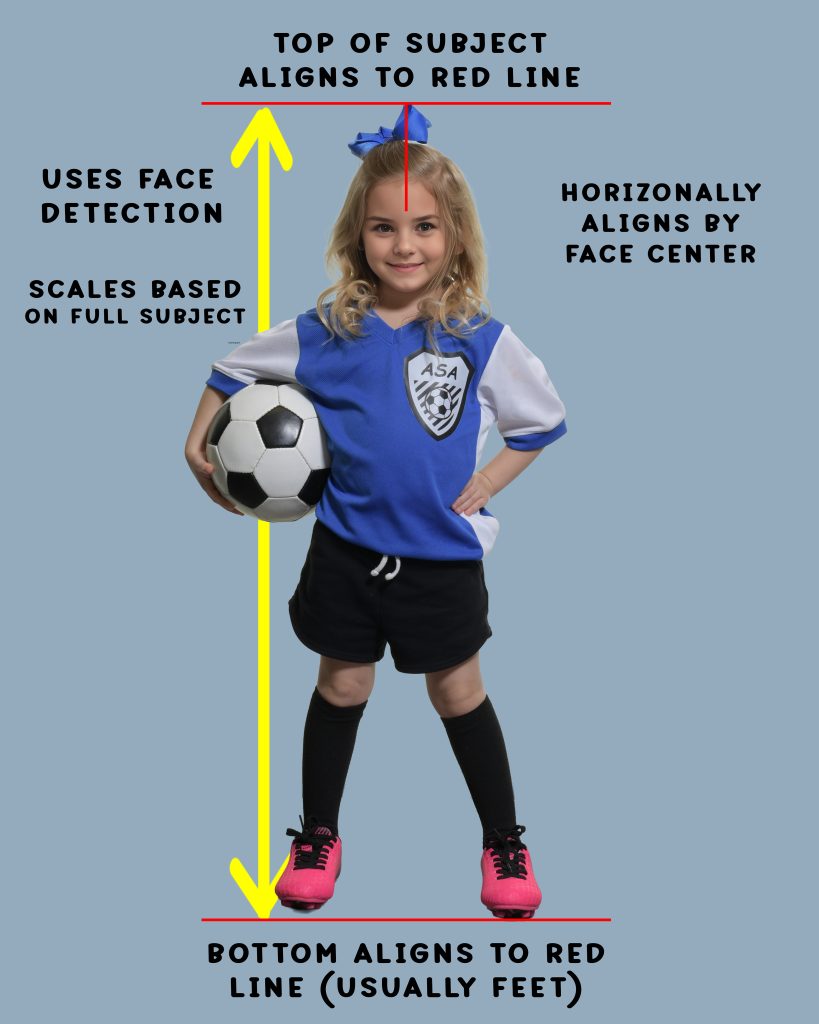
| 3 | Yes | Yes | Yes | Face Center | *Top to Bottom of Subject | Scales image to fit between top and bottom red lines; aligns horizontally based on face center. |
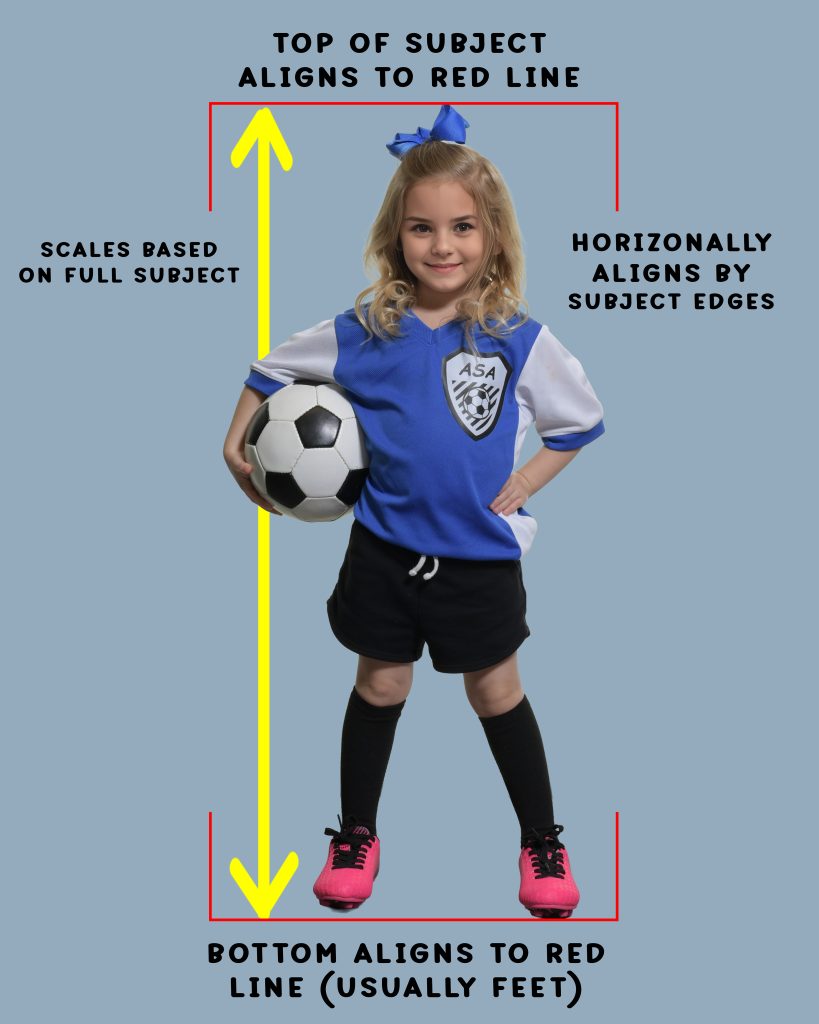
| 4 | No | Yes | Yes | *Centers Subject | *Top to Bottom of Subject | Similar to Mode 3 but aligns horizontally based on subject edges; does not use face detection. |
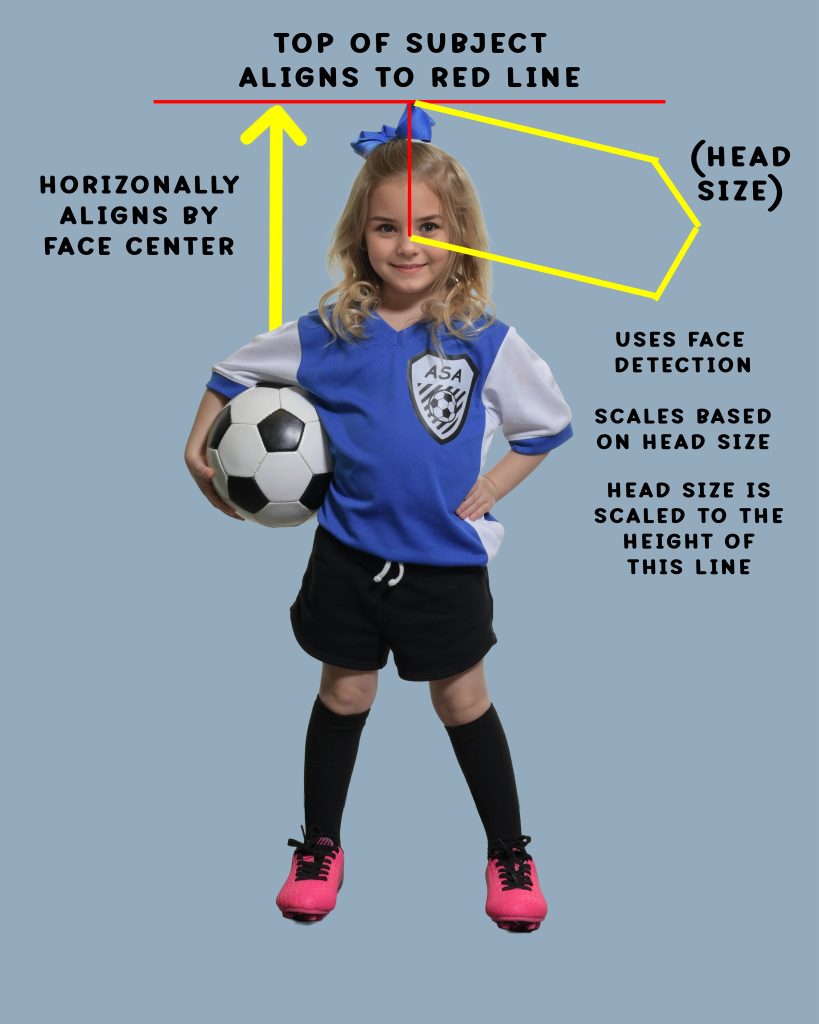
| 5 | Yes | Yes | No | Face Center | Face Size | *Aligns top of subject to top red line; horizontal positioning based on face center. |
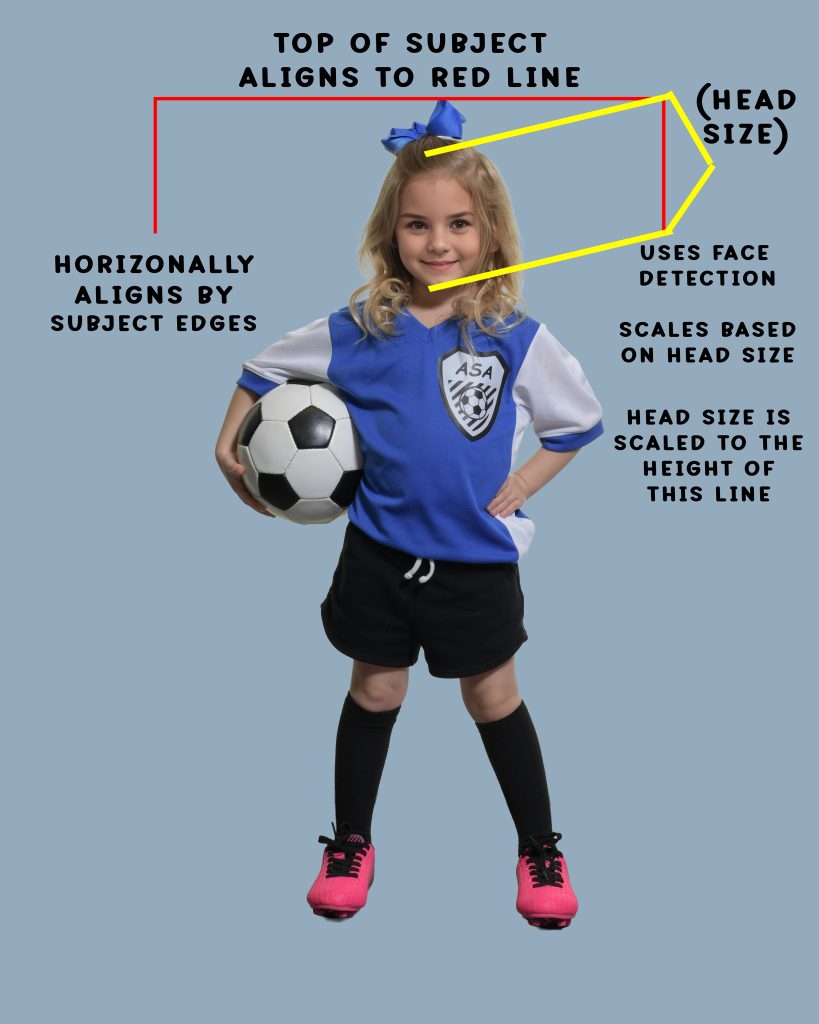
| 6 | Yes | Yes | No | *Centers Subject | Face Size | Similar to Mode 5 but horizontal positioning based on subject edges. |
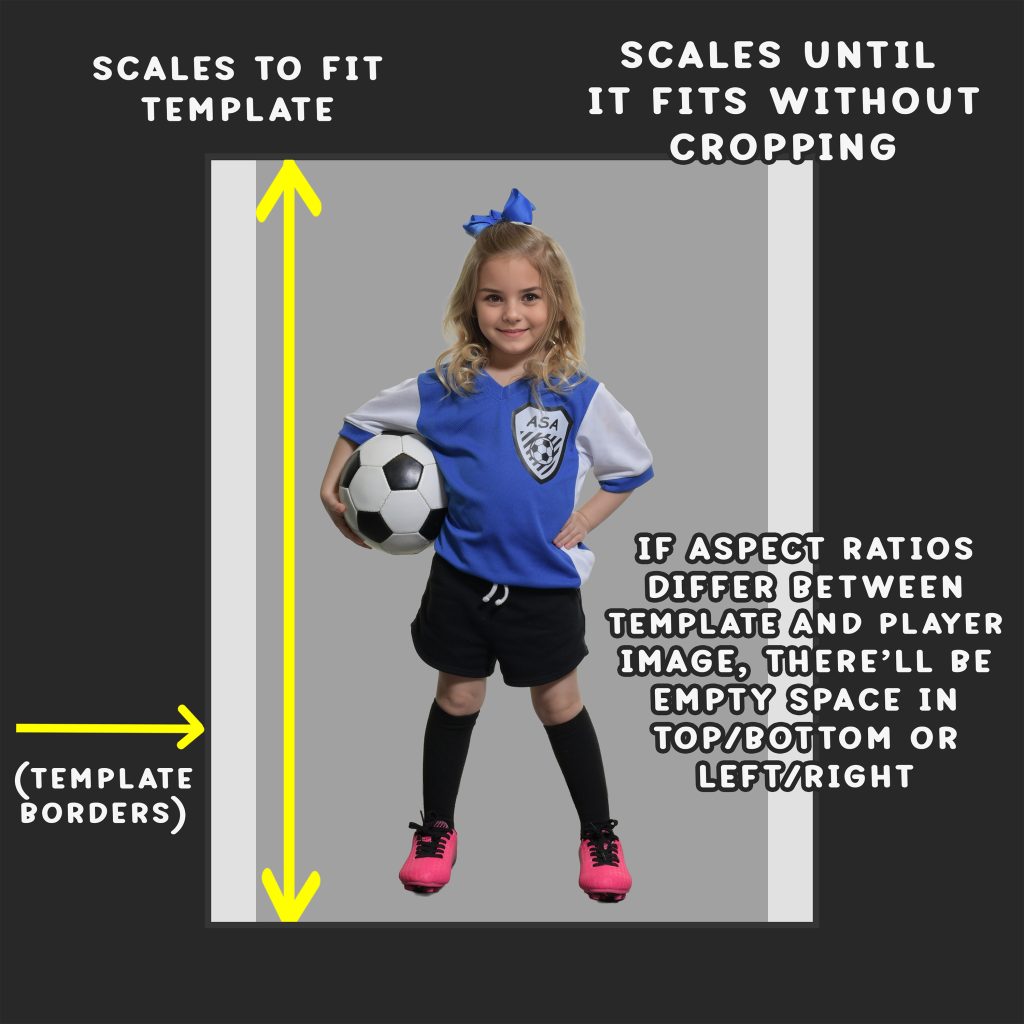
| 7 | No | No | No | Canvas Edges | Canvas Size | Scales image to fit PSD template; maintains aspect ratio; may leave empty space if aspect ratios differ. |
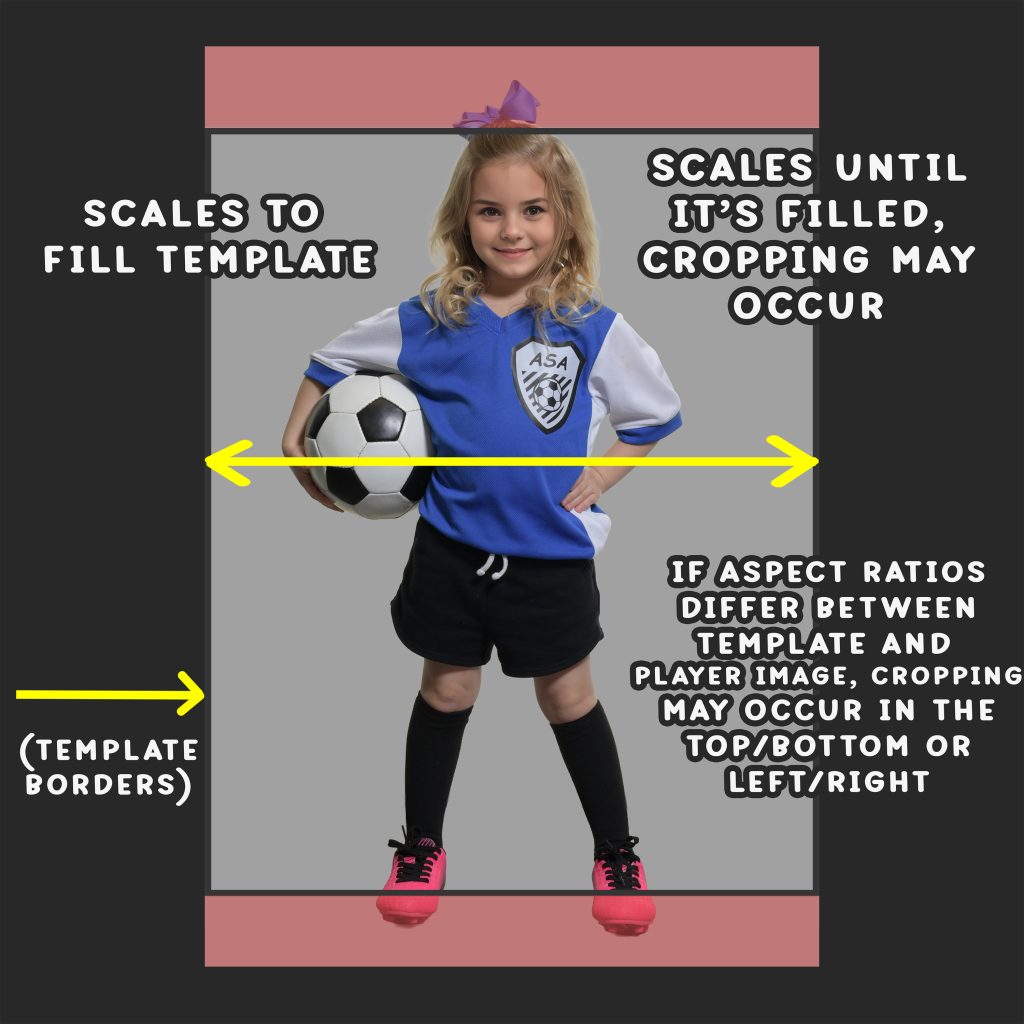
| 8 | No | No | No | Canvas Edges | Canvas Size | Similar to Mode 7 but scales image to fill PSD template; may crop edges if aspect ratios differ. |
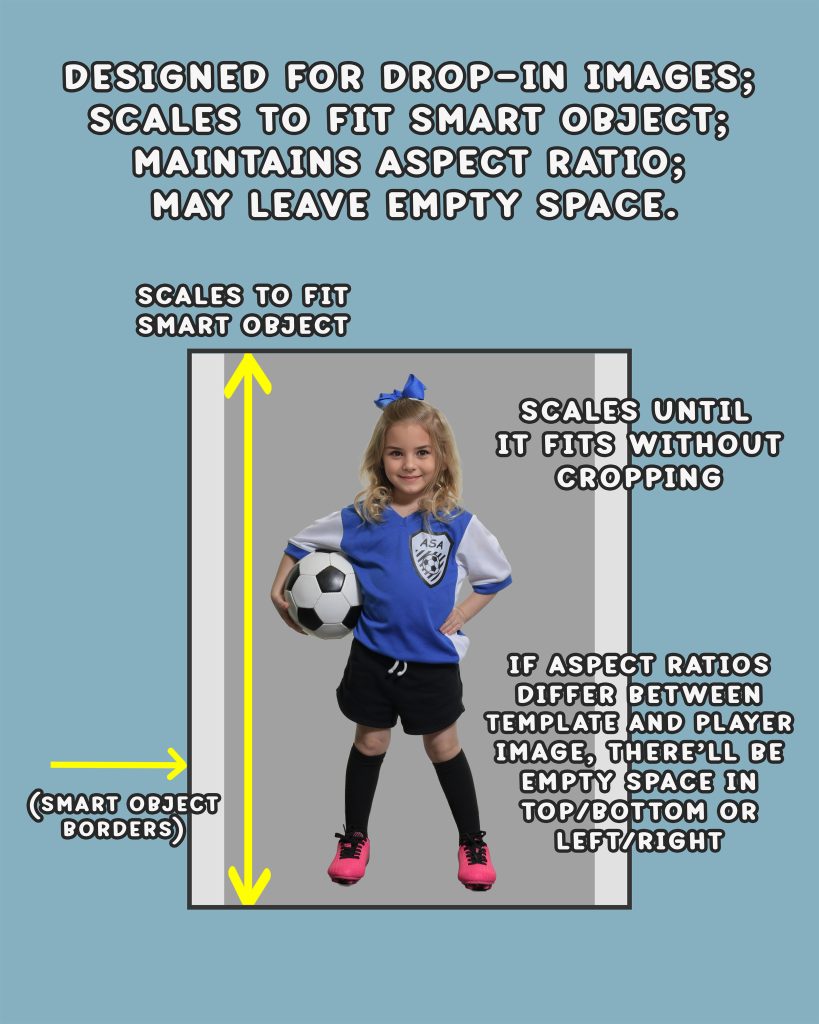
| 9 | No | No | No | Smart Object Edges | Smart Object | Designed for drop-in images; scales to fit smart object; maintains aspect ratio; may leave empty space. |
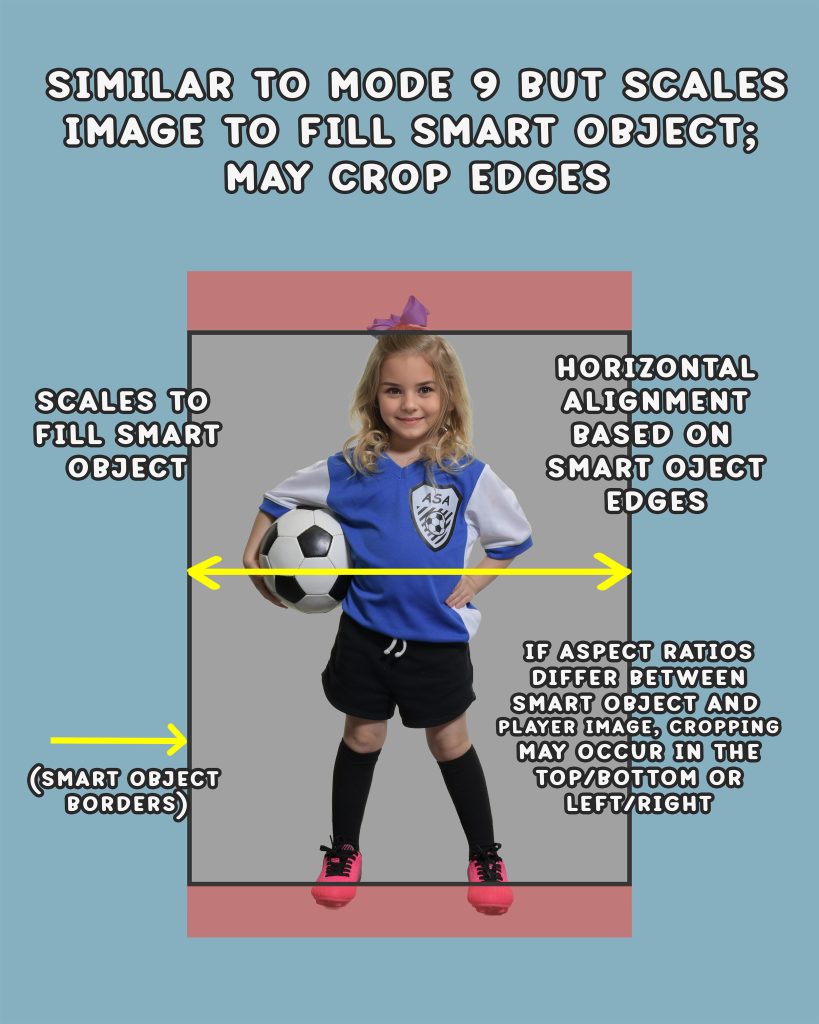
| 10 | No | No | No | Smart Object Edges | Smart Object | Designed for drop-in images; scales image to fill smart object; may crop edges. |
*If the “use select subject” option for player edges is selected in the SPA settings, then Photoshop will run Select > Subject and SPA will use the subject edges instead of the transparency edges for the alignment. Always use this setting for 2, 3, 4, 5, 6 for non-cutout images.
Use cases for the modes:
Modes 1, 5, 6 – Use for non-full body images. (I.e., Knee and up, thigh and up)
Modes 2, 3, 4 – Use fully body images. You can also scale the setup player layer with the bottom red line below the canvas to crop full body images and it from the thigh up in the composite, for ex.
Modes 1-6 – Use for cutout (best), but can also use non-cutout
Modes 7-10 – Use for non-cutout
PLAYER ALIGNMENT MODE 2
PLAYER ALIGNMENT MODE 3
PLAYER ALIGNMENT MODE 4
PLAYER ALIGNMENT MODE 5
PLAYER ALIGNMENT MODE 6
Note: For modes 7-10, it is best that your image ratios are the same ratios as your template. These following examples show what can happen if they are not the same ratios.
PLAYER ALIGNMENT MODE 7
PLAYER ALIGNMENT MODE 8
PLAYER ALIGNMENT MODE 9
PLAYER ALIGNMENT MODE 10
Team Modes
| Mode | Face Detection | Top Alignment | Bottom Alignment | Horizontal Alignment | Scaling Basis | Notes |
|---|---|---|---|---|---|---|
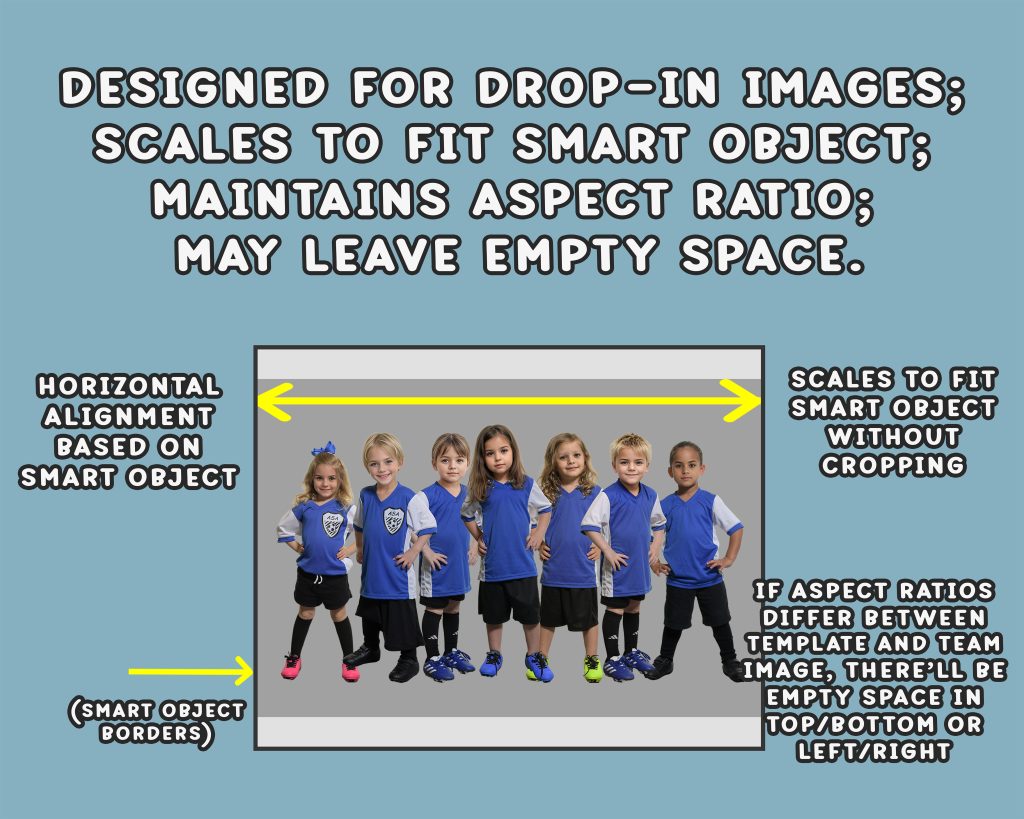
| 1 | No | No | No | Smart Object Edges | Canvas Size | Same as Player Mode 9; scales to fit smart object; maintains aspect ratio; may leave empty space. |
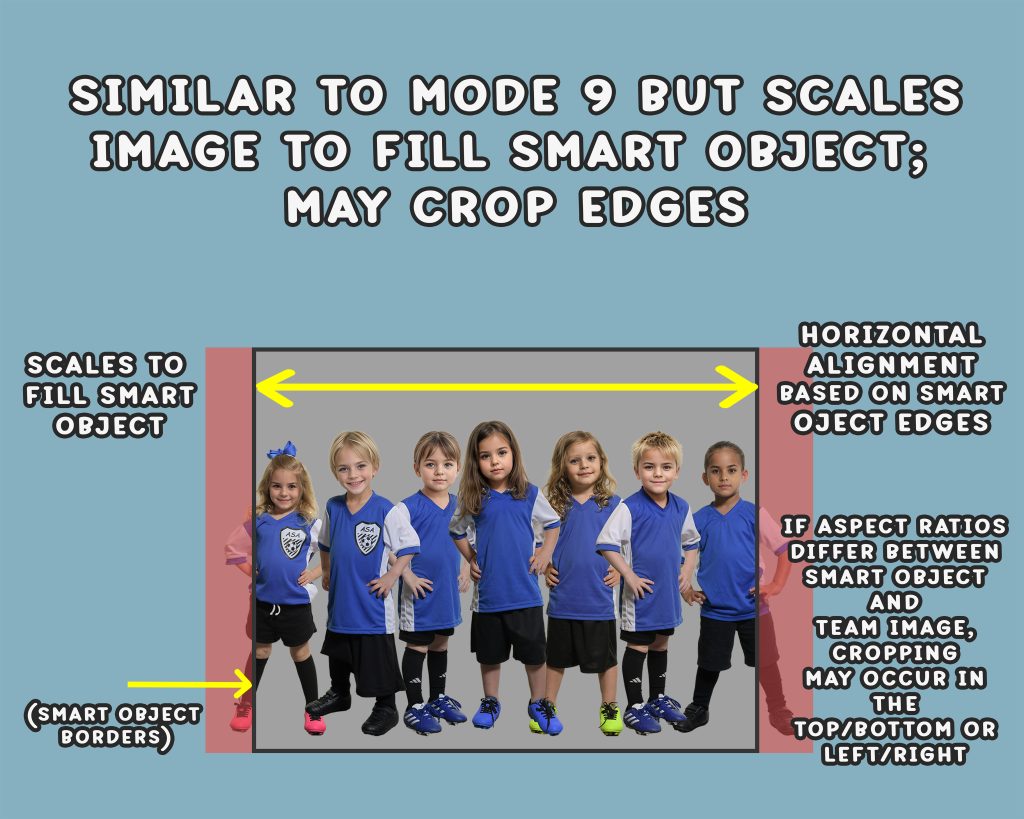
| 2 | No | No | No | Smart Object Edges | Canvas Size | Same as Player Mode 10; scales image to fill smart object; may crop edges. |
TEAM ALIGNMENT MODE 1
TEAM ALIGNMENT MODE 2
Logo Mode
| Mode | Face Detection | Top Alignment | Bottom Alignment | Horizontal Alignment | Scaling Basis | Notes |
|---|---|---|---|---|---|---|
| Logo | No | No | No | Smart Object Edges | Canvas Size | Same as Player Mode 9; but pre-crops all empty space on the logo before scaling. |
further explanation and tutorials
Player Modes 1 and 2
PLAYER MODE 1 – This uses face positioning and scaling only. The face is placed in the red box. The player is scaled based on face size. The face will fit inside the red box approximately from the chin to the top of the forehead. This mode uses the same method as the face placement in version 6. This method will not give precise alignment to the feet. If you need precision face and feet alignment then use Mode 2.
PLAYER MODE 2 – This combines face alignment and alignment to the bottom of the transparency. The face is placed so it is centered on the red cross hairs. These will not always align to the cent of the face features but to the center of the head. If the head is looking left or right the the cross hair will be a little left or right of the facial features center, this is normal. The image is scaled so the bottom of the transparency is aligned to the bottom red line. This will be the feet in most cases. However, if the player is holding an object that is below the feet such as a hockey stick or bat then the object would align to the red line instead of the feet.
Player Modes 3 and 4
PLAYER MODE 3 – The image is scaled to the top and bottom of the transparency is aligned to the top and bottom red lines. Any objects above the head or below the feet are part of the subject and will align to the top and bottom lines. If there are no objects that the top of the head and bottom of feet will align to the top and bottom lines. The horizontal alignment is based of face center. The center of the face is aligned to the vertical red line.
PLAYER MODE 4 – The image is scaled to the top and bottom of the transparency is aligned to the top and bottom red lines. Any objects above the head or below the feet are part of the subject and will align to the top and bottom lines. If there are no objects that the top of the head and bottom of feet will align to the top and bottom lines. The horizontal centering/alignment is based on the left and right edges of the transparency.
Player Modes 5 and 6
PLAYER MODE 5 – If the are no objects above the player then this will be similar to mode 1. The top of the transparency is align to the top red line. The face scaling is based on the vertical red line. Also, the horizontal positing is based on the face center and also aligned to the vertical red line. However, the face will not align vertically to the red line (it’s only used for a sizing gauge). The top of the transparency is align to the top red line which can be the top of the head or any other object the player is holder that is past the top of the head.
PLAYER MODE 6 – This is similar to mode 5 except the horizontal center positioning is based on the edges of the transparency instead of the face. The top of the transparency is align to the top red line. The face scaling is based on the vertical red lines beside the top red line. The face will not align vertically to the red line (it’s only used for a sizing gauge). The top of the transparency is align to the top red line which can be the top of the head or any other object the player is holder that is past the top of the head.
Player Modes 7 and 8
PLAYER MODE 7 – This mode is for either cutout images or non-cutout images. The player layer is auto-scaled to fit the PSD template. If the aspect ratio of the player image is different than the aspect ratio of the PSD template then there will be empty space left. It will scale the image to fit it but won’t cut anything off. If the aspect ratio of the player image is exactly the same as the PSD template the image will be scaled to fit perfectly on the PSD, exactly like the Paste in Place method from version 6. If the player image is a cutout image then it will keep the edges of the transparency from the cutout. It places and scales the image based on the canvas edges from the player image, not based on the edge of the player.
PLAYER MODE 8 – This is exactly like version 7 except for how it works when the aspect ratio of the player image is different than the aspect ratio of the PSD template. When the aspect ratios are different it will scale so it fills the entire PSD template with the player image. In that case, edges of the player image will be cut off. If the player image has the exact same aspect ratio as the PSD template then the player image will be scaled to fir the PSD perfectly.
Player Modes 9 and 10
PLAYER MODE 9 – This mode is mainly for drop-in style images that are not cut out. However, it will work with cutout images as well. This will edit the smart object and add the player image to the smart object. The player layer is auto-scaled to fit the smart object. If the aspect ratio of the player image is different than the aspect ratio of the smart object then there will be empty space left. It will scale the image to fit it but won’t cut anything off. If the aspect ratio of the player image is exactly the same as the smart object then the image will be scaled to fit perfectly inside the smart object.
IMPORTANT: If you want to change the aspect ratio of the smart object, then you need to do it from inside of the smart object itself, NOT in the main PSD template. It’s best to set the smart object image size to the EXACT dimensions of the image that you are placing into it during the batch. If you decide to change the aspect ratio later it is simpler to just add a new layer group from the SPA HTML panel and enter the new dimensions.
PLAYER MODE 10 – This works exactly the same as mode 9 except how it scales the player image when the smart object aspect ratio doesn’t match the player image. It will scale the image to fill the entire smart object but edges will be cut off instead of leaving empty space.
Team Modes 1 and 2
Team Modes 1 and 2 – Team Mode 1 works exactly like Player Modes 9 and 10. Team Mode 2 works exactly like Player Mode 10.