Video Tutorials
Video tutorials are located at the bottom of the page – CLICK HERE.
Video tutorials are located at the bottom of the page – CLICK HERE.
Sports Photo Automation can use CSV or TSV data to customize the compositions on a per image basis. Data functions include the following.
This is a basic sample data file. This is showing text replacement for 4 layers without text resizing.
Column A – Cell A1 must contain the word SPA. This is how the program knows where the data will start.
All entries in columns A below SPA will be the image file names from the player images source folder. The image names must match your file names exactly. The entries must have the file extension. For example, if your file name is DSC_2345.png then don’t just put DSC_2345 in the cell. It must be entered as DCS_2345.png.
Other Columns – The other columns are for any custom processing commands that need done. This can be text replacement, photoshop action, custom file renaming, ect. There are no particular order for the other columns other than column A. Also, all columns are optional. Only use the columns you need based on the tasks you are giving it to do from the data file.
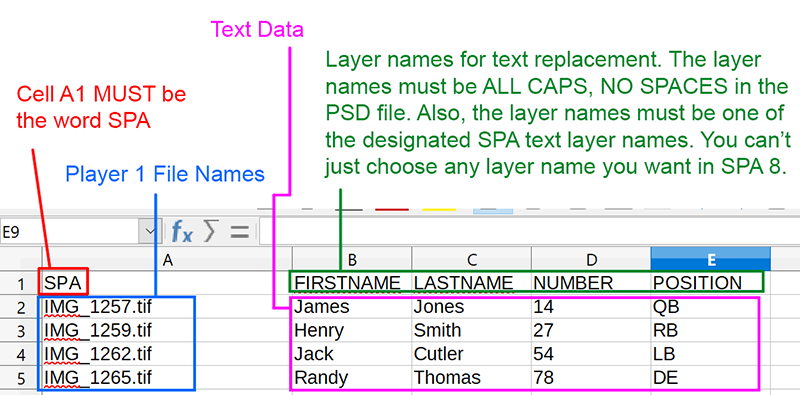
To use the text replacement, you need to add the column header to match the layer name in the data file. In the cell data, enter the text you want to replace. The layer name in the PSD template MUST be one of the designated SPA text layer names. Also, the layer name in the PSD template must be ALL CAPS, NO SPACES. You can’t just choose any layer names you want for the text layers if you want to use auto text replacement.
This is the list of valid SPA text layer names.
Text resizing in SPA 10 works differently than in prior SPA versions. Version 10 uses a newer and simpler method for text resizing.
With SPA 10, there are NO RESIZING COLUMNS in the data file. However, it still does resizing, it is just handled through the PSD setup instead of through the data file. This way, the data file will always be the same. If you have 2 different templates that need text layers resized differently, you don’t need to change the data file structure. Instead, the PSD files for each template are setup with different resizing methods. That way you can easily use the same data file for all of your different templates.
There are only 2 different resize methods with SPA 10, which will do all of the same functions as the 6 modes in the SPA 9.
The 2 resize modes are as follow
Mode R – This will resize the text so fits the exact width of the placeholder text. It will size up or down as needed to force the new text to always be the length of the placeholder text. This mode will do the same job as the SPA 9 plugin modes of X, A, and Y. With mode R in SPA 10, it automatically detects if the text is horizontal, vertical or angled. Therefore, it doesn’t need 3 different modes to tell it this. Mode R will work with all text angles and also with text made with the vertical type tool in Photoshop.
Mode RM – This works exactly the same as mode R except it will only resize text that is longer than the placeholder text but won’t resize text that is short than the placeholder text. It does the same thing as mode XM, AM, and YM do in SPA 9.
How to assign resizing modes to text layers –
The resizing methods are defined by the text layer names in the PSD templates. You will add -R or -RM at the end of the text layer name. The layer name must be all caps, no spaces.
For example using the TEAMNAME text layer. For the PSD the layer name should be as follows.
TEAMNAME : This assigns no text resizing to the layer. The text will not be automatically resized.
TEAMNAME-R : This assigns resize mode R to the text layer.
TEAMNAME-RM : This assigns resize mode RM to the text layer.
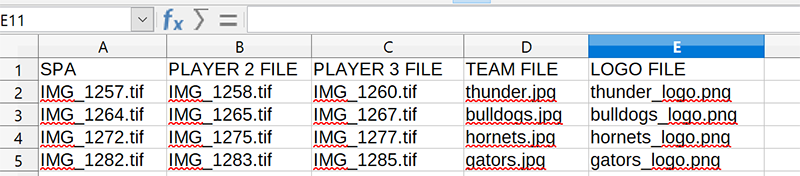
You can add additional player images, team images and logo images through the csv file. In order to add the extra image files, the template must also have the setup layers added using the PSD setup from the plugin.
For additional player images, the images must be in the same folder as the player 1 images. You can add up to 3 players.
For the team and logo images, you must select the option in the batch settings to use the CSV for teams and or logos. Then you need to select the folder that contains the teams and/or logo images. It is best to not use the players folder to store the teams and logos. However, if you do then it will still work as long you run using the CSV file. However, if you run a batch WITHOUT the CSV file and you have team images and logo images mixed in the player folder then it will try to use all of the images as player images.
Additional CSV Header Codes-
Note: The cell data is case sensitive. The headers ARE NOT case sensitive.
NEW FILE NAME – This will use a custom file name to use when saving the final image. If the cell is empty then it defaults to the naming that was selected in the Sports Photo Automation Lab user interface.
APPEND FILE NAME – This will add a text string to the end of the file name. This may also be used in combination with the NEW FILE NAME header.
SUB FOLDER – This will save the composite to a subfolder of the save folder.
Note: DON’T put the entire path in. Only put the name of the subfolder (or path) that is after the save folder.
For example, if the save folder is named Broncos and you want a folder named Memory Mates, then only Enter Memory Mates in the cell. The it will save to a folder called Memory Mates under the Broncos Folder. If you want nested subfolder then you can also enter those in the cell with either or / separating the folders. So for example, if the save folder was Broncos and you entered Individuals/8X10 in the cell, it would save to Broncos/Individuals/8X10.
You don’t need to create the subfolders first. If the subfolders don’t exist, then SPA will create the folders automatically.
TEAM FILE – This is used to define the team file for a memory mate template. It will reference the team folder selected in the batch settings window. The names must contain the file extension.
LOGO FILE – This is used to define the logo file for the template. It will reference the logo folder selected in the batch settings window. The names must contain the file extension.
PLAYER 2 FILE or PLAYER FILE 2 – Both header names do the same thing. There are just 2 different header name options (in order to keep CSV compatibility for SPA 7 an 8).
This will add a second image. The image can be another image of the player, a logo image, or any other image that you want to add on a per player basis. The image file must also be in the same source folder that the batch is being ran in.
PLAYER 3 FILE or PLAYER FILE 3 – Works the same as Player 2 File.
BG FILE, BACKGROUND FILE, or TEMPLATE FILE – All 3 header names do the same thing. There are just 3 different header name options (in order to keep CSV compatibility for SPA 7 and 8).
This will use the background or PSD template in the cell. It will reference the backgrounds folder selected in the batch settings window. If the cell is blank then it will use the default background file selected in the batch settings window.
HIDE LAYER 1 (and 2, 3, 4, 5) – Use these to hide up to 5 layers in the PSD template. It is meant to be used with dynamic template setup for batching so you can change the look of the template per group composite in the batch.
SHOW LAYER 1 (and 2, 3, 4, 5) – Use these to show up to 5 layers in the PSD template. You can save the PSD with the visibility strategically turned off and then use these columns to show the layers for specific composites. It is meant to be used with dynamic template setup for batching so you can change the look of the template per group composite in the batch.
PRE ACTION 1 (and 2, 3) – Use this to run a Photoshop action on the file before it is extracted. You can run up to 3 actions. They run in sequential order. The column names will be Pre Action 1, Pre Action, 2, or Pre Action 3. In the cell data put the name of the Action Set and the Action separated by the “|” character (the one on the key above the enter key).
POST ACTION 1 (and 2, 3) – This is set up the exact same way as the pre actions except the header read as Post Action 1, Post Action 2, etc. up to 5. The actions run after the template has been completed but before it is flattened and saved.
If your data has commas in it then you need to use another delimiter such as a semicolon. This video explains that and more.
Auto resizing text in version 10 is easier than prior versions. It is also less time consuming because the data files don’t need to have resize columns. This video discusses the new method for version 10 compared to the old method.
Note: The videos below are for the OLD SPA VERSION 9. These videos are scheduled to be recreated for SPA 10.
Check back soon for the updated videos.
This video covers the basics for starting to use CSV files with SPA.
You can use the auto CSV starter to quickly setup the CSV structure. This will ensure that the CSV headers and player file names are correct.
When using quotes, the CSV data must be set up with “curly” quotes, not “straight” quotes. Using straight quotes will cause extra hidden quotes to be added to the data file which you will not see in the spreadsheet (but can see in a plain text editor).
Also, You will need to use a font in your PSD files that works with curly quotes.