DATA IMPORTING FOR EZ COMPOSITES

What Data Importing is for

The most common item for using data importing is text replacement for the student names. However, the data can be used for other automation tasks as well.

  • Auto replace text
  • Force placement order of images
  • Auto replace logo in graphics file
  • Hide or Show layers in template PSD (per group)
  • Run photoshop actions on the template PSD file (per group)

Video Tutorials

Video tutorials are located at the bottom of the page – CLICK HERE.

Data Modes

When building templates, there is a dropdown selection to choose the data import mode.  In the dropdown, there are 3 options.  However, when batch processing, there will only be the option for data file because batch processing requires a data file.  When not batch processing, you can still use a data file if you want but that is optional.

  1. NONE – This will not import any data.  Also, if not using data, the visibility (eyeball) is turned of on the text layers for the image slots.  So if the template has names with placeholder text, you can run without data if you don’t want names in the composites and it will turn off the layers.
  2. FILENAMES – This will import the first and last name from the filename for auto text replacement. The filename must start with Lastname_Firstname for it to work. The names must be separated with an underscore for it to work.  A filename of “Smith_John.jpg” is an example. You can also have an addition underscore after the first name and it will ignore everything else behind the second underscore.   So for example, the filename could be “Smith_John_313223_Springfield_Highschool.jpg”.

    When using the filename data import, yhe only data that it will import is first and last names. If you need other data to import then you must use a data file instead.

  3. DATA FILE – This will import the data for a file. The file can be .csv, .tsv, or .txt.  The data delimiter can be comma, semicolon, tab, or colon for any of the 3 file extensions. EZ Composites will automatically detect which delimiter the file is using when importing the data.

    IMPORTANT – you can’t use a delimiter character if that character occurs in the data. So for example, if you use commas in your filenames or text data, you can’t use a comma delimited data file. You would need to use another delimiter in this case such as semicolon.

CREATING DATA FILES

You can create data files using any software and method that you want, as long as the completed file conforms to the EZ Composites standards.  There are a lot of different data collection methods and software that photographers use.  it would not be practical for EZ Composites to attempt to accept all of these different formats “as is” as they are all different. So instead, EZ Composites has it’s own file structure that it accepts.  Generally, this means that you would needs to export the data from whatever system you are using, change the column headers to the appropriate EZ Composites headers, and possibly add in additional columns of data as needed.

Data file formatting requirements

  • The data files can be saved with .csv, .tsv, or .txt file extensions.  For the purpose of EZ Composites, all 3 of these file extensions are treated EXACTLY the same.  So you can use the extension of your choice.
  • The data delimiter can be comma, tab, semicolon, or colon. EZ Composites will automatically determine which delimiter is being used when importing the data. There isn’t a specific delimiter for each file extension type.  You can use any of the 4 file delimiters for any of the 3 file extensions.  As far as EZ Composites is concerned, .csv, .tsv and .txt are all the same and it will look for comma, tab, semicolon, and colon delimiters for all of those files and detect which one is being used.
  • IMPORTANT!!! – You can’t use a delimiter character that is also contained in the data. This will cause the data to not  import correctly into EZ Composites. So for example, if your filenames have commas such as “last,first.jpg” then then the commas in the filenames will interfere with the data import if the files uses a comma delimiter. Also, if the text layers have a comma, for example if a text layer is “Mr. Reynold, 5th Grade”, the comma will also cause data import issues if the file uses a somma delimiter.  In these cases, you must save the data file with another delimiter such as tab, semicolon, or colon.
  • IMPORTANT!!! – The data files must be saved using the UTF-8 character set. If UTF-8 isn’t used then EZ Composites will not import non-english characters. For example, names such as Núñez and Gómez won’t import correctly.  You choose the UTF-8 character set when exporting the data from Excel or whatever spreadsheet program you are using.

Data file starter

EZ Composites comes with a built in data file starter. This allows you to easily create a file with the proper header and column structure. The date file can import first and last names from the filenames if the filenames begin with”Lastname_Firstname”. The Data File start will not import any other data. You don’t need to use the data file starter. However, it is a great way to see what he proper file structure is for the data set and what the proper header names are.

Data File Starter features – the numbers are referenced to the labels from the screenshot image below.

  1. Selects the Delimiter to use. Choose from Comma, Tab, Semicolon, or Colon. Don’t use comma if the data will have commas in it… such as commas in the filenames or commas in the text layers.
  2. Selects the file extension to use. Choose from .csv, .tsv, or .txt. It doesn’t matter which extension you use. EZ Composites treats all of the file extensions the same. All 3 file extensions work with all 4 delimiters.
  3. If checked, this option will auto fill out the data sheet in the FIRSTNAME and LASTNAME columns with text from the filenames. In order to use this, the filenames must begin with “Lastname_Firstname”.
  4. The button select all headers or unselect all headers.
  5. Select whatever column headers you want.  This list of headers are all of the headers that EZ Composites will recognize. Note: There are no checkboxes for FIRSTNAME and LASTNAME because those headers are always created by the Data File Starter.

Data File Example

For the data file, you only need to add data columns for data items that you are using.

For the student name text, you ALWAYS need the first and last names in separate columns with the headers of FIRSTNAME and LASTNAME.  If the template has the full name in one text layer, still use the same data sheet set up with FIRSTNAME and LASTNAME columns, NOT a column called NAME like it is done with the SPA plugin.  With the EZ Composites plugin, if the template is set up with the full name in one text layer then it will automatically combine the text data from the FIRSTNAME and LASTNAME column and enter the combined data into the full name layer when it creates the composite.

For text layers, there are NOT any text resizing columns like how it is done for the Sports Photo Automation plugin. With EZ Composites, the text resizing options are handled solely by the PSD template setup, not with the data file. See the text resizing section below for more details.

Image Level Column Headers

  • FIRSTNAME – Text replacement for first name
  • LASTNAME – Text replacement for last name
  • TEXT – Optional text layer for image slot. To use this, the template must be set up with the additional text layer.
  • FORCEORDER – This column will force the sorting order so you can override the default sorting order. The most common example if to put 1 for the image that you want to force into slot 1 and leave the rest blank, for example a teacher image in slot 1.  When putting just 1 into one slot, it will put that into slot 1 and the rest will sort by LASTNAME and then by FIRSTNAME. Note that the number does not actually force an image to a specific slot. So for example, you can’t just put 5 in one slot and expect that image to go into slot 5.  If you put 5 in one image and leave the rest blank then then that image would go into slot 1 because the 5 would get sorted to the top.

    How it works, is the data sheet is first sorted by the FORCEORDER column (if the column exists), then by the LASTNAME column, and then by the FIRSTNAME column. Any empty columns get assigned a sort value of 10,000. So if you want to force images to the end then you can put 10,000, 10,002 ect and those images will sort to the bottom.

    You can also fill out all of the number to force the entire layout. So for example, if you had 50 images then you could fill out the entire column, 1 – 50 for the exact order you wanted.

  • GROUPID – This is used to group images by class (or team). All images with the same GROUPID will get grouped together on the same composite. The GROUPID can be any name you want. When running a batch process, it will also use this name as the filename that it saves the composite with.

Group Level Column Headers - Text Layers

Group level headers are for data items that belong to the entire GROUPID. With the group level data, you only need to enter the data into 1 row per GROUPID.  You can enter the data into all rows but that isn’t needed.  EZ Composites will use the data from the first row it find data in for each GROUPID, after it has sorted the data sheet (which may not be the top row in the data sheet for each group).  So if there is conflicting data in more than 1 row for the same GROUPID then anything after the first row of data it finds gets ignored.

The following header are used for group level text layer to auto replace text. These are the text layers that are contained in the EZCOMP-GRAPHICS.PSD file.  The text is replaced once for each group, not for each student.  So if you are running memory mates and saving a different composite for each student, then it will still only replace the text once for the entire group and the file for every student will have the same group text.

  • TEACHER
  • GRADE
  • YEAR
  • SCHOOLNAME
  • TEAMNAME
  • LEAGUENAME
  • POSITION
  • NUMBER
  • GROUPTEXT1
  • GROUPTEXT2
  • GROUPTEXT3
  • GROUPTEXT4
  • GROUPTEXT5

Text Resizing

Text resizing in EZ Composites works differently than in the SPA plugin that many users are already familiar with. EZ Composites uses a newer and simpler method for text resizing which can accomplish the same thing as SPA does.

With EZ Composites, there are NO RESIZING COLUMNS in the data file. However, it still does resizing, it is just handled through the PSD setup instead of through the data file. This way, the data file will always be the same. If you have 2 different templates that need text layers resized differently, you don’t need to change the data file structure. Instead, the PSD files for each template are setup with different resizing methods. That way you can easily use the same data file for all of your different templates.

There are only 2 different resize methods with EZ Composites, which will do all of the same functions as the 6 modes in the SPA plugin.

The 2 resize modes are as follow

Mode R –  This will resize the text so fits the exact width of the placeholder text. It will size up or down as needed to force the new text to always be the length of the placeholder text.  This mode will do the same job as the SPA plugin modes of X, A, and Y.  With mode R in EZ Composites, it automatically detects if the text is horizontal, vertical or angled. Therefore, it doesn’t need 3 different modes to tell it this.  Mode R will work with all text angles and also with text made with the vertical type tool in Photoshop.

Mode RM – This works exactly the same as mode R except it will only resize text that is longer than the placeholder text but won’t resize text that is short than the placeholder text.  It does the same thing as mode XM, AM, and YM from the SPA plugin.

How to assign resizing modes to text layers –

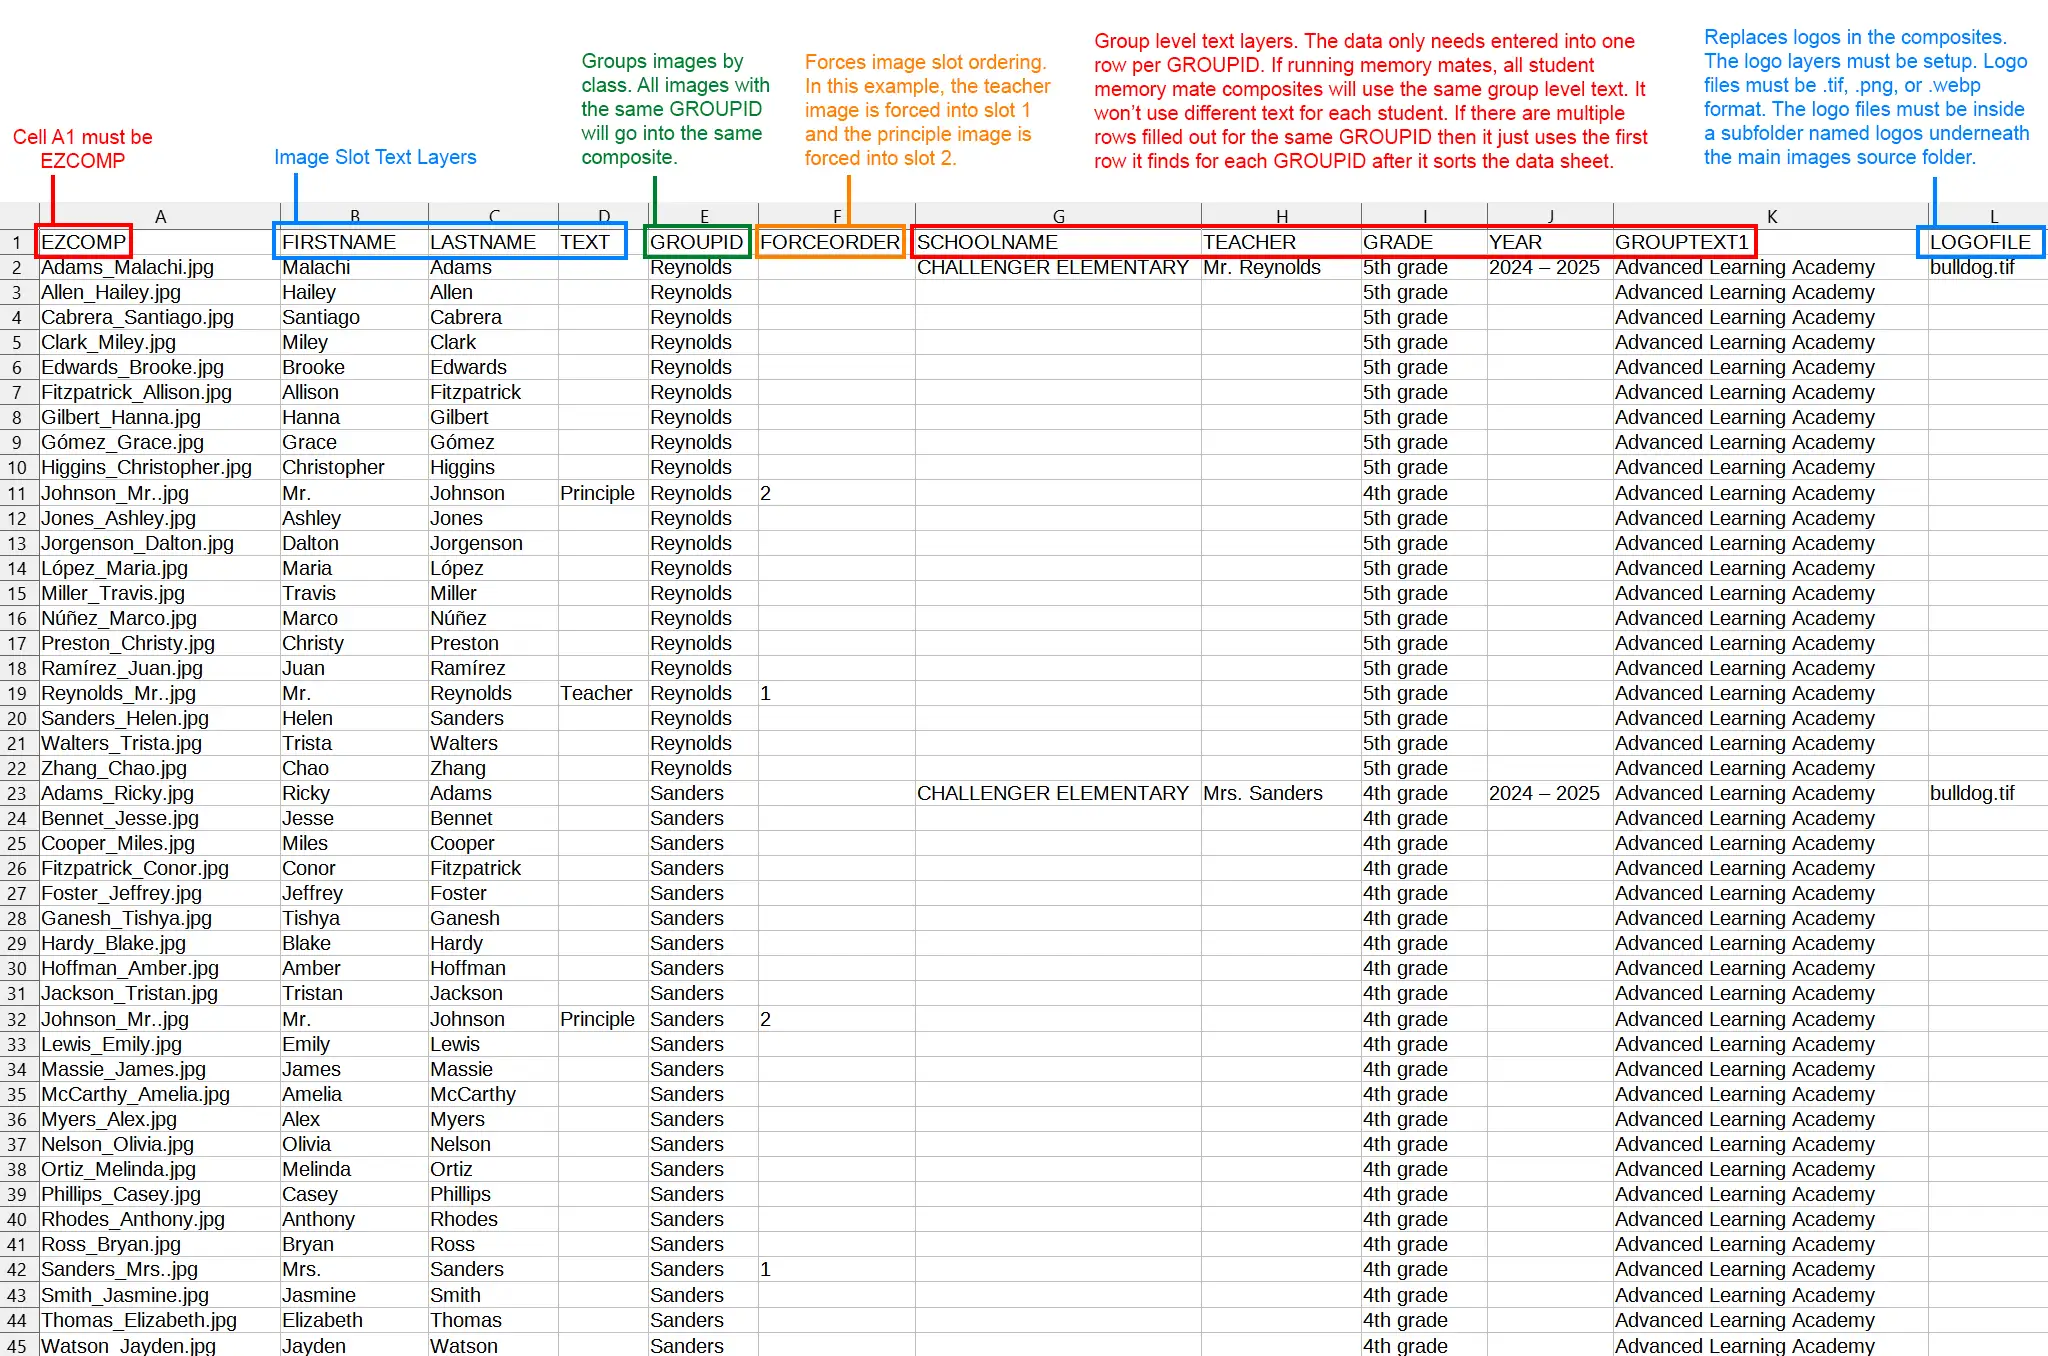
FIRSTNAME, LASTNAME, TEXT – These are the image level text layers that are assigned to each image slot. You don’t need to do anything at all. These automatically use resize mode RM.  There isn’t an option for mode R because that doesn’t make much sense for these layers.

TEACHER, GRADE, YEAR, SCHOOLNAME, TEAMNAME, LEAGUENAME, POSITION, NUMBER, GROUPTEXT1, GROUPTEXT2, GROUPTEXT3, GROUPTEXT4, GROUPTEXT5 – These are the group level text layers. For these you assign the resize mode to the end of the layer name in the PSD.  However, for the data file DO NOT add the resize mode to the header. The date file never has the resize mode in the header name. that way, the same data sheet will work for all templates, regardless of the text resize modes used.

For example using the SCHOOLNAME text layer. For the PSD the layer name should be as follows.

SCHOOLNAME : This assigns no text resizing to the layer. The text will not be automatically resized.

SCHOOLNAME-R : This assigns resize mode R to the text layer.

SCHOOLNAME-RM : This assigns resize mode RM to the text layer.

Additional Group Level Headers

  • LOGOFILE – Replaces logos in the composites. The logo layers must be setup in the PSD. Logo files must be .tif, .png, or .webp format. The data must contina the exact filename, including the file extension. When batching, the logo files must be inside a subfolder named logos underneath the main images source folder.
  • HIDELAYER1 (and 2, 3, 4, 5) – Use these to hide up to 5 layers in the PSD template. It is meant to be used with dynamic template setup for batching so you can change the look of the template per group composite in the batch.
  • SHOWLAYER1 (and 2, 3, 4, 5) – Use these to show up to 5 layers in the PSD template. You can save the PSD with the visibility strategically turned off and then use these columns to show the layers for specific composites. It is meant to be used with dynamic template setup for batching so you can change the look of the template per group composite in the batch.
  • ACTION1 (and 2, 3) – Use this to run up to 3 Photoshop actions on the PSD template. The actions will run after EZ Composites has combined the PSD layout file with the PSD graphics file. You can run up to 3 actions. They run in sequential order.  In the cell data put the name of the Action Set and the Action separated by the “|” character (the one on the key above the enter key). The purpose of these is for dynamic template creation.

    Note: Pixnub DOES NOT provide any tech support for how to create photoshop action to perform different tasks on your custom template. This is a high level task that requires a high degree of Photoshop skill. This is outside the realm of Pixnub support. However, the feature is there for advanced Photoshop users who don’t need help with it.

VIDEO TUTORIALS

Using Data Files

Batch Processing